Segments
The Segments tab allows users to filter and target specific subscriber groups based on predefined conditions. Users can create, manage, and view audience segments.
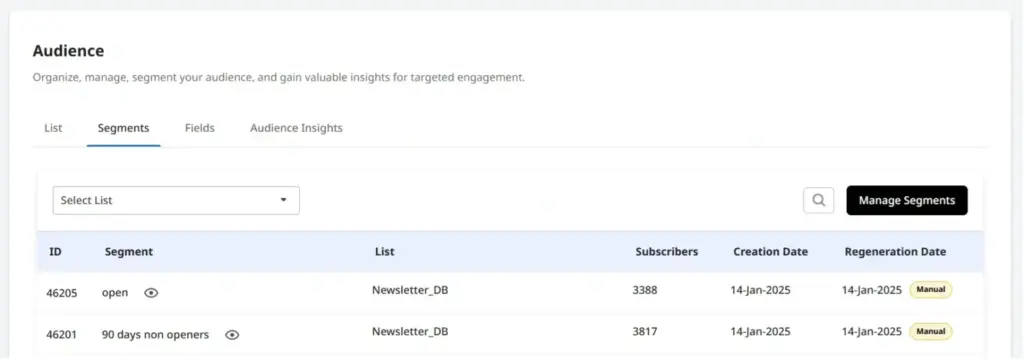
Upon accessing this page, all existing segments are listed by default. Users can:
- Filter segments by mailing list
- Search for a segment by name
Each segment entry displays the following details:
- ID – A unique identifier assigned to the segment
- Segment Name – The name of the segment
- List – The mailing list associated with the segment
- Subscribers – The total number of subscribers in the segment
- Creation Date – The date the segment was originally created
- Regeneration Date – The most recent date the segment was refreshed. An icon next to the date indicates whether regeneration is set to manual or automatic
Manage Segments
Clicking the Manage Segment button takes you to the Segment Management page. This page offers similar functionality as the Segments homepage, including options to filter and search segments. You can also view key details such as:
- ID – A unique identifier assigned to the segment
- Segment Name – The name of the segment
- List – The mailing list associated with the segment
- Subscribers – The total number of subscribers in the segment
- Creation Date – The date the segment was originally created
- Regeneration Date – The most recent date the segment was refreshed. An icon next to the date indicates whether regeneration is set to manual or automatic
- Actions – actions available are
- Edit – Modify the segment’s configuration
- Duplicate – Create a copy of the segment
- Make Suppression – Convert the segment into a suppression list
- Regenerate – Refresh the segment
- Download – Export the segment data
- Delete – Permanently remove the segment
The Segment Management module in cmercury also enables you to create targeted audience groups based on specific conditions. This ensures that your email campaigns reach the right subscribers, improving personalization, engagement, and overall campaign performance.
By leveraging segmentation, you can filter your audience based on:
- Engagement history (email opens, clicks, or sends)
- Subscription details (when they joined)
- Custom subscriber attributes (e.g., location, preferences, or demographics)
Creating a New Segment
Step 1: Access the “Create Segment” Option
You can create a segment from two locations:
- During Campaign Creation:
- Navigate to the Campaigns module.
- Click “Create New Campaign” and go to the Audience Selection page.
- Click “Create Segment” to define a new audience.
- From My Segments:
- Go to the Subscribers module.
- Select the My Segments tab.
- Click “Create Segment” to start defining your audience.
Step 2: Define Your Segment
In the “Create Your Segment” popup:
- Enter a Segment Name.
- Select the List in which the segment should be created.
- Click “Continue” to proceed.
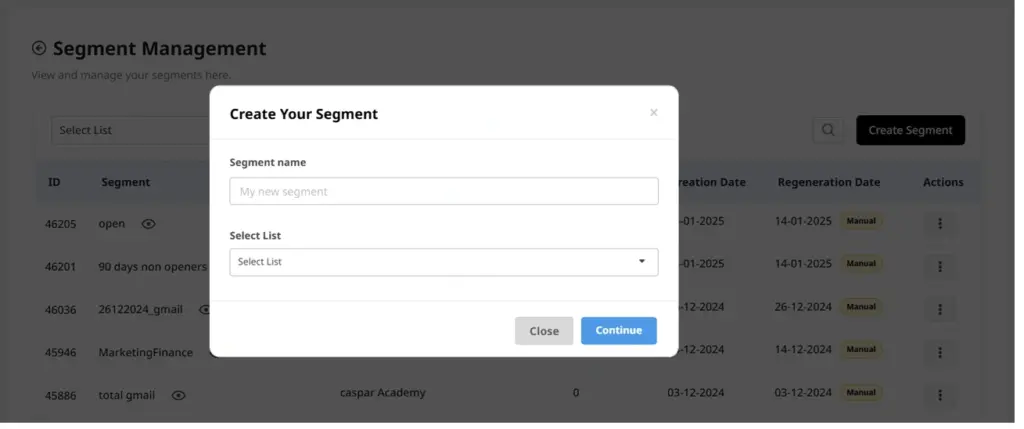
You will then be directed to the Segment Conditions page to refine your audience selection.
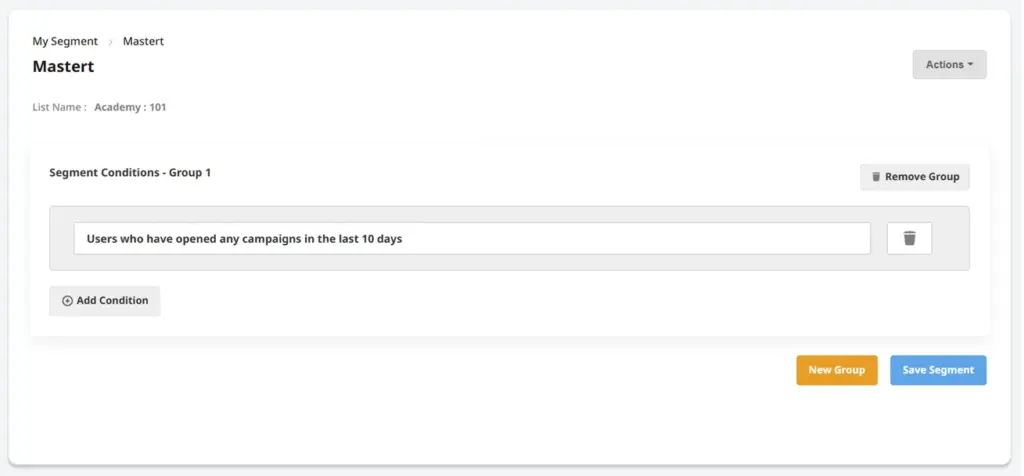
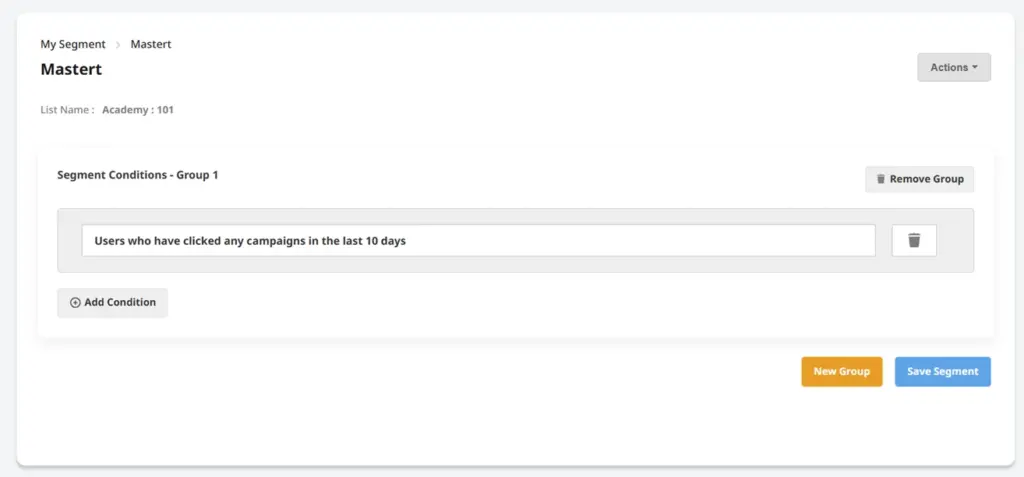
Adding Segment Conditions
1. Send Condition (Target Users Based on Email Sends)
Filter users based on whether they have/have not received emails from:
- Regular campaigns
- Automated campaigns
- Both
- Days-based filtering – Specify users who have/have not received an email within X days.
- Date range filtering – Choose a From and To date to filter users based on specific email send dates.
- Click “Show Campaigns” to display past emails and define whether the segment includes:
- Users who were sent these campaigns
- Users who were NOT sent these campaigns

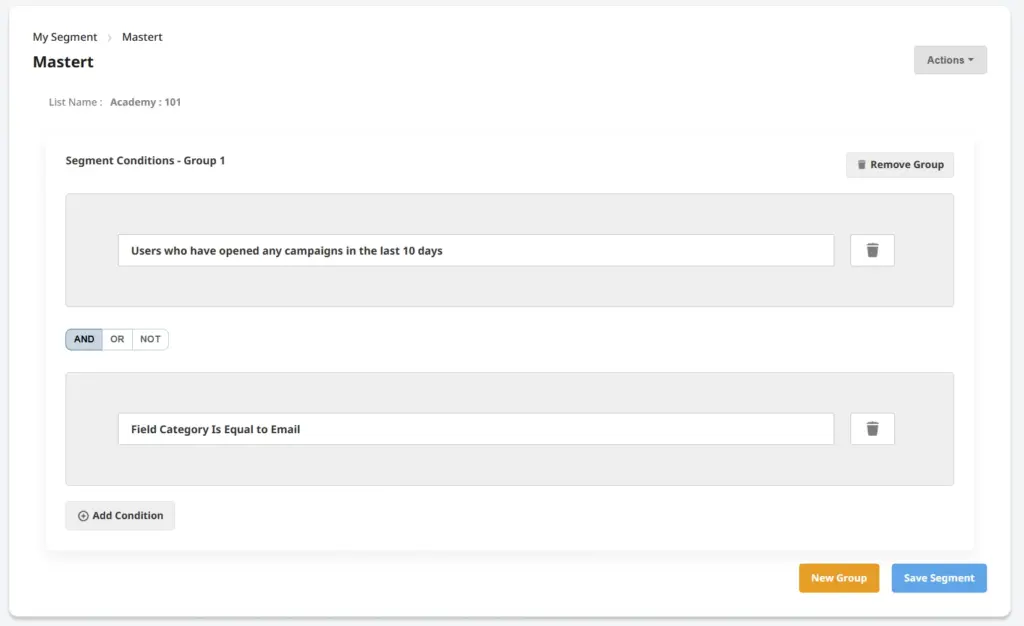
2. Open Condition (Target Users Based on Email Opens)
Refine further using:
Filter users based on whether they have/have not opened emails from:
- Regular campaigns
- Automated campaigns
- Both
Refine further using:
- Days-based filtering – Specify if users have/have not opened an email within X days.
- Date range filtering – Choose a From and To date to filter based on email open history.
- Click “Show Campaigns” to display past emails and define whether the segment includes:
- Users who opened the emails
- Users who did NOT open the emails
3. Click Condition (Target Users Based on Email Clicks)
Filter users based on whether they have/have not clicked links in emails from:
- Regular campaigns
- Automated campaigns
- Both
- Days-based filtering – Specify if users have/have not clicked within X days.
- Date range filtering – Choose a From and To date to filter based on past clicks.
- Click “Show Campaigns” to display past emails and define whether the segment includes:
- Users who clicked the email links
- Users who did NOT click any links
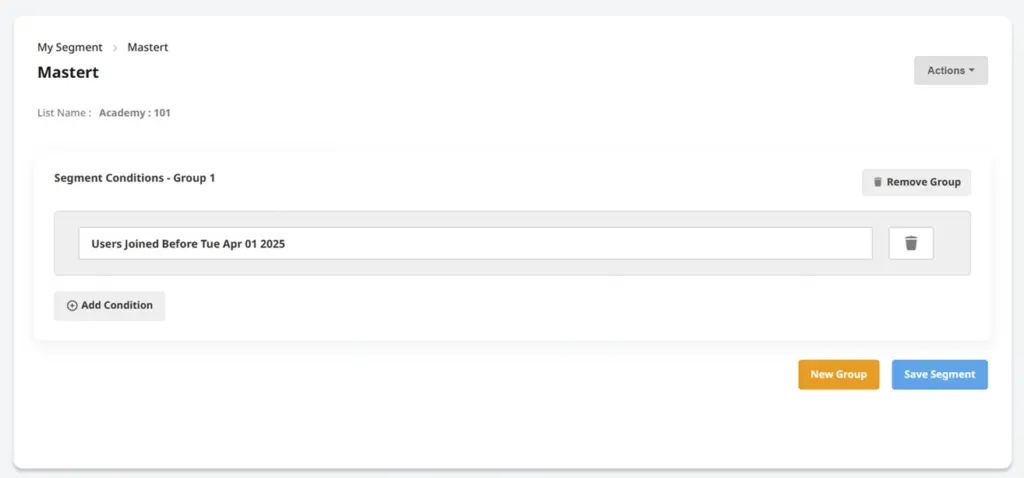
4. Joined Condition (Target Users Based on Subscription Date)
Refine further using:
Filter users based on when they joined your list:
- Joined before a specific date
- Joined after a specific date
- Joined on a specific date
- Joined within the last X days
5. Fields Condition (Target Users Based on Subscriber Attributes)
Filter users based on specific subscriber attributes, such as:
- Demographics (e.g., gender, age, location)
- User preferences
- Custom data fields
Apply filtering operators to refine your segment:
- Is equal to / Is not equal to
- Contains / Does not contain
- Is Null / Is Not Null

Combining Multiple Conditions
You can create advanced audience segments by combining multiple conditions using logical operators:
- AND – The subscriber meets all specified conditions.
- OR – The subscriber meets at least one of the specified conditions.
- NOT – The subscriber does not meet the specified condition.
This flexibility allows for highly targeted audience segments, improving precision and campaign effectiveness.
Finalizing and Saving the Segment
- Review the selected conditions.
- Click “Save Segment” to finalize.
- Your segment will now be available under the My Segments tab for use in future campaigns.
Conclusion
The Segments feature in cmercury helps you refine your email marketing strategy by allowing you to create highly targeted audience groups. With segmentation, you can:
✅ Improve personalization and engagement
✅ Optimize campaign performance
✅ Increase conversions by reaching the right audience at the right time
Start using audience segmentation today to make your email marketing more effective!


